WORKSCRIPTS

Here are some Python & Javascript apps i wrote to streamline my workflow. I will periodically rotate scripts here. For now, I have limited the download of my After Effects Customizable tool shelf because I’m freelancing now & it has dramatically sped up my workflow making me more competitive.

VIRTUAL ENVIRONMENT

Use a venv (virtual environment) to install needed plugins or to specify a specific python version to run a particular python script. this is very useful & i depend on this for all of my specialized scripts.

WHAT AE FILE RENDERED THIS MOVIE

Useful script to determine which AE file rendered a movie. Useful in collaborative work environments where more than one person may have taken over a shot. Also useful if other artists are lazy about updating the Slate or HUD.

NUMBERS SHOTGRID

An OSX alternative to using Excel to track your shots. This script will query a spreadsheet using the Apple native software Numbers & show the attributes you select to show. Easier than trying to read a spreadsheet of shots to find the one detail you need like lens or camera back.

After effects - Customizable project tool shelf

Edit the CSV file with your favorite tools & the project toolshelf will have them ready to use. Adjust for each project to streamline your workflow. Useful especially if your project has complicated naming conventions. This is a persistent floating tool shelf of your personal tools separate from the studio’s generic tool shelf.

NUITKA

UPDATE 04/2024 : No more need to create a standalone app. Apple Script can execute Python scripts directly via Terminal shell using a Virtual Environment to specify Python version & plugins. I’m keeping this up though in case someone needs to create a standalone app nonetheless.

Step-by-step instruction on how to create standalone apps from python scripts on the new Apple Silicon M1/M2 chips sets. Also a link to the old Intel method.

Python for Maya

Section i’ll be continually updating with useful Python commands I need for work. normally you can just use the Maya Mel commands & implement them into the python shell using the “import maya.cmds as cmds” line & then add the “cmds.” before the Mel command. but sometimes the Python parameter calls differ slightly from Mel.


HOW TO MAKE A VIRTUAL ENVIRONMENT

cd to the directory where your python script lives

:: CREATE THE VENV

$ python3 -m venv env

:: ACTIVATE THE VENV

$ source env/bin/activate

====== HOW TO INSTALL PLUGINS ====

IF YOU'RE USING 'PIP' TO INSTALL:

$ pip install plugin_name

IF YOU'RE USING 'BREW' TO INSTALL:

(need to install HOMEBREW on your machine beforehand)

$ brew install plugin_name

====== TO LIST INSTALLED PLUGINS ====

$ pip list

-- or --

$ brew list

$ brew list --cask


work scripts demonstration

here’s a quick video showing how i use the different work scripts.

====== PROJECT NAMING CONVENTION ======

SceneCode Shot# POSTVIS Company Version Increment Artist

Example of a AE file name -> AX2030_POSTVIS_TF_v001_0001_TS.aep

AE’s built-in “Increment & Save” won’t work because it tags a 0001 to the end of this long file name. My Increment Up script find the Increment section of the name & ++ the number. Version Up will find the v### section of the name & ++ the version as well as reset the Increment to 0001.


what ae file rendered this movie

Useful Python script that displays the After Effects file that rendered the selected movie. Very useful in a work environment where multiple artists may have worked on a shot & saved multiple versions. This script will tell you precisely which file rendered the quicktime movie. (need to have Homebrew installed) -> https://brew.sh

  • open a Terminal shell & install the ‘exiftool’ using the brew command:

    >    brew install exiftool
  • note the install location path & version number of the exiftool & edit the line in the script :

    '/opt/homebrew/Cellar/exiftool/12.70/bin/exiftool'

  • Launch the python script & browse to the Quicktime Movie.

  • a popup will display the path to your After Effects project.

    NOTE : AFTER EFFECT PROJECT NEEDS TO BE SAVED BEFORE RENDERING IN ORDER TO UPDATE THE EMBEDDED METADATA.

popup message will tell you what After Effects scene file rendered this movie. Very useful where you might have multiple versions of file.

Numbers Shotgrid spreadsheet browser

for mac users

UPDATE v20 - Nov 2023

NEW UPDATE !! now you can browse to your .Numbers Spreadsheet from the popup menu. No need to touch the code.

Added error checking in case the Camera/Lens/Frames data is empty or doesn’t match the format “cam/len/frames”

Streamlined it so you can just edit the CAMERAS in the .numbers file. the python script will now automatically update the list of scenes as you add new tables to the spreadsheet. Will also update the cameras.

VERY IMPORTANT!! :

  • need to keep the Scene numbers as integers (no decimals or letters).

  • Need to keep the camera/lens/frames format to the Shot Info. ‘/ / /’ if no data to avoid error message.

NUMBERS_SHOTGRID.PY : One of the coolest python scripts i’ve written so far. all the data browsers require you to convert your Apple Numbers spreadsheets to CSV or JSON format in order to read the cells. or they require Excel spreadsheets and don’t support the Apple Numbers software.i found a python module that can read the .numbers format & created a searchable dataframe using Pandas without having to convert it & will query in realtime so it updates to immediate changes to the spreadsheet. Finally a python script where you can use the Mac native Numbers software to synchronize your shot grid data. you need to update the camerainfo dictionary with your new entries. follow the entry convention for the track_info as : camera code / lens / frames with the ‘/’ separator.

>> EDIT THE CAMERAS TAB OF THE SPREADSHEET TO ADD NEW CAMERAS TO THE DATAFRAME. FOLLOW THE TEMPLATE FORMAT

NUMBERS TEMPLATE : use the Numbers template to create your own spreadsheet. then edit the ShowInfo.py with the name of your scene or show (SCENE = 'WXYZ'). don’t rename the Variables NUMPATH or SCENE otherwise the connections will be broken. edit anything in quotes & the camera codes.

TO RUN: Terminal - if you’re running python 3 already then you just need to install 2 modules (paste in terminal shell). otherwise you can upgrade your python. make a virtual environment. cd to your directory & install.

  > cd yourDirectory/
  > conda create --name myenv python==3.10.11 pandas numpy numbers-parser

> conda activate myenv

  > python3 Numbers_shotgrid_##.py 

POPUP WINDOW SHOULD APPEAR. JUST KEEP IT UP SO YOU CAN KEEP QUERYING SHOTS. CLOSE WHEN YOU’RE DONE.

To turn off the Virtual Environment either close the terminal or type in the same terminal :

> conda deactivate


numbers shot grid demonstration

Quick video on how i use the OSX naive Numbers app as ShotGrid/Shotgun reference.


Numbers spreadsheet with camera data, notes & working files versions. the only format you need to adhere to is your track_info must be camera / lens / frames in that order with a ‘/’ separator.

[2023] New Pop up menu! - Browse to your .Numbers Spreadsheet file. Your scene codes will populate the menu. Enter your shot number on the input line.

Enter the shot number & choose the Scene.

Check which info you wish to display - Track Info, Notes & Versions.

Results window will display requested info. it also changes to remind the tracker to 1/2 the lens for anamorphic shots. i didn’t want to automatically adjust the lens since the compensation isn’t exact & differs shot to shot. camera solutions for an anamorphic 150mm may fall between 75 - 90mm. reminder to the tracker to adjust the range.


after effects palette shelf

>> SEE WORK SCRIPTS DEMONSTRATION MOVIE ABOVE <<

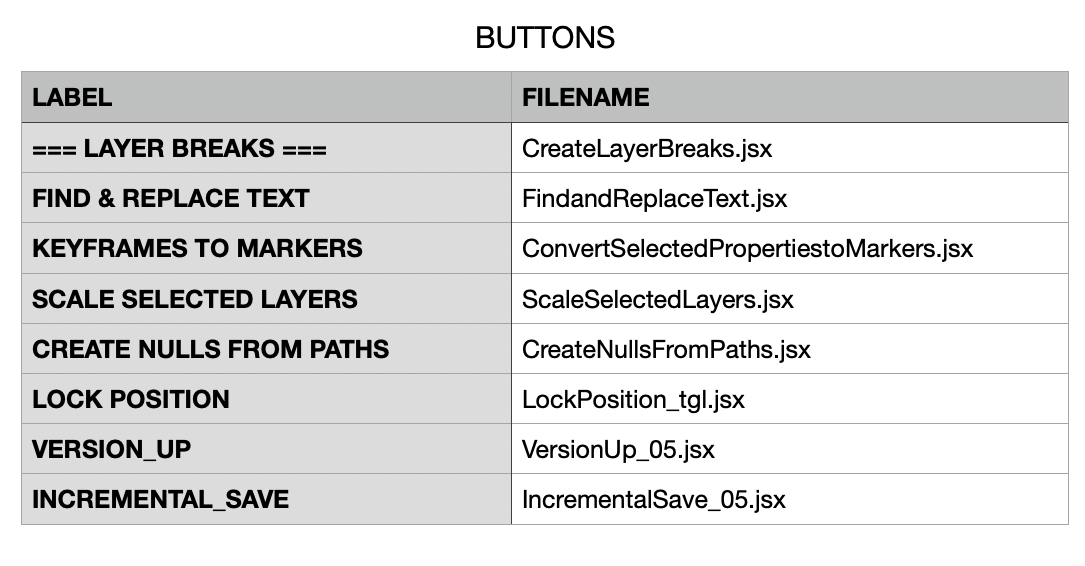
:: Streamlined the customization so all you need to do edit the BUTTONS.csv file.

:: to add your own script - just put the Javascript into the WORK directory. edit the BUTTONS.numbers file.

then just export as BUTTONS.csv

VERSION UP : addresses the incrementing bug & fixes it by manually incrementing each digit separately rather than as a four digit padded integer.

LOCK POSITION - Addresses the need to lock just the position of a layer when you’re still working on it. Huge snowballing problem if one layer is accidentally shifted by a few pixels & you think it is centered in place. AE only gives you the option to lock/unlock an entire layer but then you can’t adjust it.

>> Since i’m freelance this year i’m limiting downloads of this since it is so useful. kind of like my secret sauce at getting my shots out the door faster than my coworkers. each studio has their own workflows & tool shelves. this is my own & let’s me customize it to work for me. Disney, Marvel & DC require naming conventions for scene files & movies that don’t work with the generic tools in After Effects (such as versioning or incrementing up). my tool shelf overcomes these issues with javascripts that adhere to the project naming convention.

BUTTONS.numbers Edit & customize the Work Scripts shelf button layout in Numbers. Then save as BUTTONS.csv

v5 - NEW & IMPROVED!! Version Up scene files. File name needs ‘_’ underscores

SHOW_scene_postvis_vendor_version_subversion_artist

“WXYZ_####_postvis_aaa_v0001_01_aa.aepx”

————

NULLS FROM PATHS - opens up a shelf with 3 options - Nulls follow Points, Points Follow Nulls & Trace Path.

NULLS FOLLOW POINTS -Makes it possible to attach elements to animated points

POINTS FOLLOW NULLS - Constrain mask points to animated nulls.

TRACE PATH - useful to make a null follow the shape of an animated path even if it is distorting on a per frame basis.

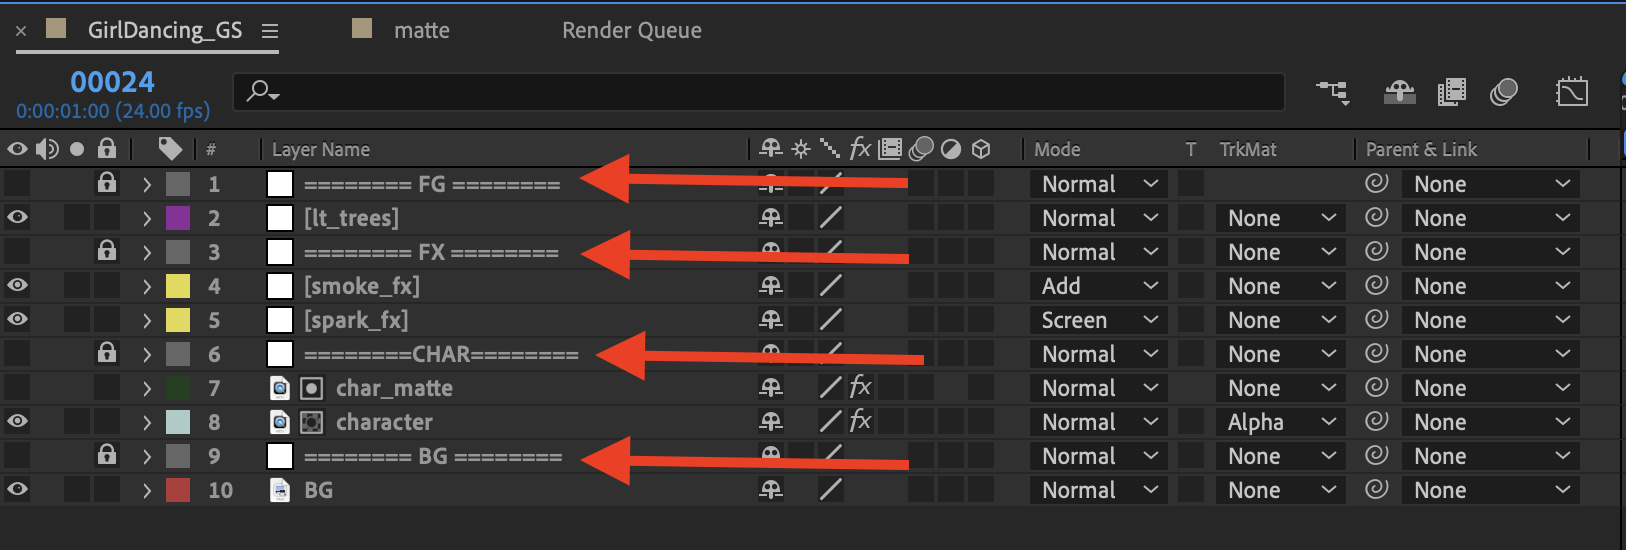
LAYER BREAKS - creates dividers in your comp so you can see what each element does. need to first select the composition & then hit the button.

if they show up as ‘NULL01, 02…’ then just toggle the Source Name to Layer Name. rename or reorder them as needed.

FIND & REPLACE TEXT - useful for filling in long nomenclature names on the HUD & SLATES. will find all template names & replace them with the stored text.

LOCK POSITION - Addresses the need to lock only the position of a layer when you’re still working on it. Huge snowballing problem if one layer is accidentally shifted by a few pixels & you think it is centered in place. AE only gives you the option to lock/unlock the entire layer but then you can’t work on it.

KEYFRAME TO MARKERS - select an animated parameter & hit the button to put markers at all the keyframes. useful for synchronizing lightning flashes or other animated effects across the comp.

“WXYZ_1000_postvis_abc_0002_05_xx.aep”

VERSION_UP : for scene file naming conventions with underscore breaks in the name. will version up number after the 4th underscore: 0002 —> 0003 & saves file.

INCREMENTAL_SAVE : versions up the subversion of the scene (number after the 5th underscore) 05 > 06 & saves file

NUITKA - CREATE STANDALONE APPS FROM PYTHON CODE 

NEW APPLE M1 or M2 SILICON WORKSFLOW

Mac OSX +13.0  ( tested on Ventura 13.3.1 )

APPS WILL ONLY WORK ON COMPUTERS USING THE SAME OS AS THE ONE THAT CREATED IT!!!

Converts Python code to C. You’ll need a C Compiler (free with X-Code)

==============================================================

FOR INTEL MACS, SEE :    py2app tutorial

==============================================================

Super simple method. no need to download zip & install.

just use pip to install

NUITKA INSTRUCTIONS & FIX

( 1 )

Start by creating a project and a virtual environment.

    > mkdir yourAppDirectory
    > cd yourAppDirectory/
    > python3 -m venv env

( 2 )

Activate the virtual environment and pip install nuitka and pyside6.

    > source env/bin/activate
    > pip install nuitka
    > pip install pyside6

( 3 )

COMPILE AN EXECUTABLE WITH NUITKA : main.py = your python script.

    > python3 -m nuitka --follow-imports --enable-plugin=pyside6 --standalone main.py

you should see a progress & finally a confirmation that the conversion was successful:

Successfully created 'main.dist/main.bin'

( 4 )

At this point, you can execute the binary with this command in a terminal (cd to the directory):

    > main.dist/main.bin


( use )

Really easy to add an Apple Script to the top shelf where you can just click on the icon to activate your python standalone script.

Hit Command + Space bar : enter ‘Script Editor.app’

Script Editor / Settings /

Puts the Apple Script Icon on the top shelf for easy access

From the Script Menu Icon on the top shelf, open the Apple Scripts Computer Folder & create a new script. paste & edit the following script to open your new python standalone app.

name your new script with the following extension : NewScript.scpt

| StockCheck_app.scpt


tell application "Terminal"
	activate
	do script "cd /Users/yourName/pathToYourApp/yourAppDirectory && source env/bin/activate && main.dist/main.bin"
end tell


you can easily run your python standalone scripts by just clicking on the top shelf icon. Makes life easy to customize the apps you need to be more productive.


Python / MEL for Maya

:: some useful Python & Mel commands for Maya. Make a Python (or Mel) shelf button to run.
================== PYTHON
## Import Maya file into current Maya scene
import maya.cmds as cmds
cmds.file(“path/to/file.ma”), i=True)
================== PYTHON
## Reference Obj (any format) into current Maya scene
import maya.cmds as cmds
cmds.file(“path/to/file.obj”), reference=True)
================= PYTHON
## Set the start/end of the slider & range of the timeline
import maya.cmds as cmds

cmds.playbackOptions(ast=1001,min=1001)
cmds.playbackOptions(aet=1200,max=1200)
================== PYTHON
## Sets Camera IP Depth to 1, AlphaGain = 0.7
import os
import maya.cmds as cmds

ip = cmds.ls( type='imagePlane' )
cmds.select(ip)
selected_image_plane = cmds.ls(selection=True, type="imagePlane")
if selected_image_plane:
    image_plane_name = selected_image_plane[0]

# Set image plane depth to 1
cmds.setAttr(image_plane_name + ".depth", 1)

# Set image plane alphaGain = .7
cmds.setAttr(image_plane_name + ".alphaGain", 0.7)
================== MEL
## Add Shelf Separator - nice vertical bar separators to organize your shelf buttons
## Make this a shelf button & click on it. only works one session for some reason, Remake for more.
addShelfSeparator()
================== PYTHON
##TURN OFF EVERYTHING & JUST SHOW CERTAIN ELEMENTS IN THE VIEWPORT
import maya.cmds as cmds

def toggleVisibilityByType(type_):
    options = {type_: True}
    state = cmds.modelEditor("modelPanel4", q=True, **options)
    options[type_] = not state
    cmds.modelEditor("modelPanel4", e=True, **options)

#TGL FOR CERTAIN ELEMENTS - Nurbs,Cameras,Polys,IP,Locators
toggleCurvesVisibility = lambda: toggleVisibilityByType("nurbsCurves")
toggleCamerasVisibility = lambda: toggleVisibilityByType("cameras")
toggleMeshesVisibility = lambda: toggleVisibilityByType("polymeshes")
toggleIPVisibility = lambda: toggleVisibilityByType("imagePlane")
toggleLocsVisibility = lambda: toggleVisibilityByType("locators")

#SHOW 'NONE', Turn OFF Grid to start clean
cmds.modelEditor("modelPanel4", edit=True, alo=False, gr=False)

#HERE'S THE TOGGLE 'ÓN' EXECUTING
toggleCurvesVisibility()
toggleCamerasVisibility()
toggleMeshesVisibility()
toggleIPVisibility()
toggleLocsVisibility()